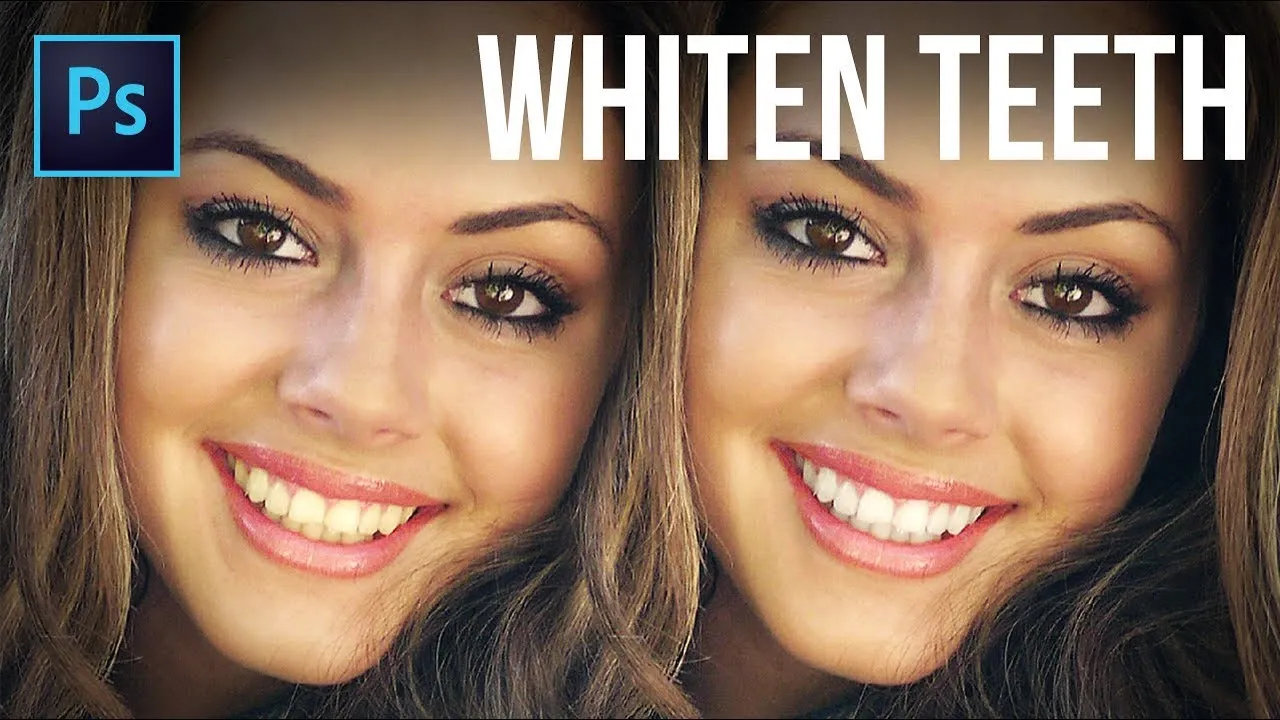
Understanding Photoshop Elements Teeth Whitening
In the realm of digital photography, the ability to enhance and refine images is a valuable skill. One of the most requested enhancements is teeth whitening, a technique used to improve the appearance of smiles in photographs. Adobe Photoshop Elements, the consumer-friendly version of Photoshop, offers a range of tools that empower users to achieve professional-looking results. This guide provides a comprehensive overview of how to whiten teeth in Photoshop Elements, focusing on techniques that are easy to understand and implement. Whether you’re a beginner or an experienced user, these tips will help you achieve natural-looking and radiant smiles in your photos. The key is understanding the tools and applying them with a degree of precision and care. We’ll walk through each step, making the process accessible and effective.
Why Whiten Teeth in Photoshop Elements
Teeth whitening in photo editing is not just about aesthetics; it can significantly enhance the overall impact of a portrait or any photograph featuring a person. Yellowing or discoloration of teeth can be distracting, drawing the eye away from the subject’s face and expression. By whitening teeth, you create a more polished and professional look. This is particularly important in portraits, where a bright, healthy smile is often considered a sign of vitality and well-being. Beyond personal photos, this skill is highly valuable for editing family portraits, social media profiles, and even professional headshots. Photoshop Elements makes this process straightforward, allowing anyone to elevate the quality of their images and create a more appealing final product. The ability to correct minor imperfections can make a world of difference in a photograph.
How to Access Photoshop Elements

Before you can start whitening teeth, you need to ensure you have Adobe Photoshop Elements installed and open on your computer. If you don’t have it already, you’ll need to purchase and download the software from Adobe’s official website. Once installed, launch Photoshop Elements. Open the photo you wish to edit by going to File > Open and selecting your image. Familiarize yourself with the interface, including the toolbar on the left, the layers panel on the right, and the main editing canvas in the center. Make sure you are comfortable with the basic navigation, such as zooming in and out and using the hand tool to move around the image. Knowing the basics of the interface is crucial before diving into the specifics of teeth whitening.
Tip 1 Using the Selection Tools
The first step in whitening teeth in Photoshop Elements is selecting the teeth. This crucial step ensures that your edits are applied only to the teeth, avoiding any unwanted changes to the surrounding gums or skin. Use the selection tools, such as the Lasso Tool, the Quick Selection Tool, or the Magic Wand Tool, found in the toolbar. The Quick Selection Tool is often the easiest option for beginners as it automatically detects edges. Click and drag over the teeth to select them. If you make a mistake, you can subtract from your selection by holding down the Alt (PC) or Option (Mac) key and clicking and dragging over the unwanted areas. Take your time to refine the selection to get the best results. Precise selection is paramount for a natural-looking outcome. Remember to zoom in to ensure accuracy.
Selecting Teeth for Whitening
When selecting the teeth, focus on capturing the entire tooth surface without including the gums. Zoom in closely to the image to make sure that your selection is accurate. If using the Quick Selection Tool, click and drag over the teeth. If the selection extends to the gums or surrounding skin, hold down the Alt/Option key and click and drag over the areas you want to deselect. If the selection doesn’t quite encompass the entire tooth, you can add to the selection by clicking and dragging over the missed areas. For more complex shapes, you may need to use a combination of selection tools to achieve the best result. The precision of this step directly impacts the final outcome of the teeth whitening process, so take your time and be as accurate as possible.
Tip 2 Adjusting Brightness and Contrast

Once the teeth are selected, the next step involves adjusting the brightness and contrast to achieve a whiter appearance. Go to Image > Adjustments and select Brightness/Contrast. A dialog box will appear, allowing you to adjust both settings. Increase the brightness slightly to make the teeth appear whiter, but be careful not to overdo it, as this can lead to an unnatural look. Then, subtly increase the contrast to enhance the definition of the teeth. Observe how the changes affect the image and make adjustments as necessary. A slight increase in both brightness and contrast is usually sufficient. If you’re unsure, make small changes at a time to prevent over-editing. The aim is to make the teeth brighter and more defined without causing them to appear artificial or overly bright.
Fine-Tuning Brightness and Contrast
After adjusting brightness and contrast, fine-tune the settings to achieve the desired effect. If the teeth appear too bright, reduce the brightness slightly. If they lack definition, increase the contrast a bit more. Pay close attention to how the teeth look in relation to the rest of the image. Make sure that the whitening doesn’t clash with the overall color balance of the photograph. Use the preview option in the Brightness/Contrast dialog box to see how your adjustments are changing the image in real-time. It’s often best to make subtle changes rather than drastic ones. Consider the lighting in the original photo and make adjustments accordingly, so the final result looks natural within the context of the image.
Tip 3 Color Correction Techniques
Sometimes, simply adjusting brightness and contrast is not enough to achieve the desired result. The teeth might have a yellow or dull tone that requires additional color correction. Use the Hue/Saturation adjustment to address this. Go to Image > Adjustments > Hue/Saturation. In the dialog box, you can adjust the Hue, Saturation, and Lightness of the selected teeth. Decreasing the Saturation will reduce any yellow tones, making the teeth appear whiter. You might also need to subtly adjust the Hue to move away from yellow and towards a brighter, cleaner tone. Make small, incremental adjustments and observe the results. Often, a slight desaturation is all that is needed to eliminate the yellow hue and enhance the whiteness of the teeth. Be cautious not to over-desaturate, as this could result in a gray appearance.
Working with Hue and Saturation

When working with Hue and Saturation, focus on reducing the yellow tones present in the teeth. Use the Saturation slider to gently decrease the intensity of the yellow. If the teeth appear slightly green or have an unnatural tint, you might need to make minor adjustments to the Hue slider. Observe the changes closely as you make them. Remember that the goal is to achieve a natural-looking whiteness. Avoid making dramatic adjustments. The Lightness slider can be used to further brighten the teeth, but it’s generally more effective to adjust brightness and contrast first, as this method maintains the natural structure and form of the teeth. Proper color correction enhances the overall aesthetic appeal of your photo, making the smile more radiant and attractive. Test the adjustments by toggling them on and off to see if they’re effective.
Tip 4 Using the Clone Stamp Tool
The Clone Stamp Tool is invaluable for fixing any imperfections or blemishes on the teeth. This tool allows you to copy a section of the image and “stamp” it over another section. Select the Clone Stamp Tool from the toolbar. Choose a soft-edged brush from the brush settings to blend the cloned area seamlessly. Click and hold the Alt (PC) or Option (Mac) key, then click on an area of the teeth that looks clean and healthy to sample it. Then, release the key and click on the area of imperfection to cover it. This is especially useful for hiding small stains, discoloration, or any other issues that might detract from the smile. Work slowly and carefully to ensure that the cloning blends naturally with the surrounding areas. Be sure to sample from multiple areas to avoid repeating patterns.
Fixing Imperfections with Clone Stamp
When using the Clone Stamp Tool to fix imperfections, choose your sample area carefully. Select a section of the tooth that is the same color and texture as the area you want to fix. Use a small brush size for more precision and avoid cloning large areas at once. Work in small increments to ensure a natural blend. Keep an eye on the surrounding areas, and make sure that your cloning doesn’t create any noticeable repetition or patterns. If you notice any unnatural artifacts, undo the last step and try again, selecting a different sample area. The clone stamp is a powerful tool, but it requires a steady hand and a keen eye to use it effectively. The goal is to seamlessly eliminate imperfections, enhancing the smile without appearing overly edited.
Tip 5 Smoothing and Refining

After whitening and correcting imperfections, the final step is smoothing and refining the edges of the teeth. The goal is to blend the changes seamlessly with the rest of the image and ensure a natural appearance. One effective method is to slightly blur the edges of the selection. Go to Filter > Blur > Gaussian Blur. In the dialog box, use a very small radius, just enough to soften the edges of the teeth. Be extremely cautious not to over-blur, as this will make the teeth appear soft and unrealistic. Another technique is to use the Smudge Tool to gently blend any harsh lines or transitions. Use a small, soft brush and carefully smudge along the edges of the teeth to create a more natural look. Refine your changes until the smile looks polished and professional. Take time to step back and look at the entire image to ensure that everything blends harmoniously.
Adding the Final Touches
To complete the process, add any final touches that can improve the overall result. Make sure to zoom in on the details, such as the edges of the teeth, to spot any areas needing further refinement. Check to see that the color of the teeth matches the overall skin tone, and if not, you might consider slight color correction adjustments. Evaluate the overall balance of the photograph and make sure that the edited teeth fit seamlessly into the image. Sometimes, a tiny adjustment to the brightness or contrast can make a big difference. Save your edited image, both as a new file (to preserve the original) and as a high-quality JPEG suitable for viewing and sharing. Review your results and compare them to the original photo to appreciate the transformation. Final touches improve the entire image, giving a polished finish.
Final Thoughts on Photoshop Elements Teeth Whitening
Whitening teeth in Photoshop Elements is a valuable skill that can dramatically improve your photos. By following these five tips, you can enhance the appearance of smiles and create more visually appealing images. Remember that practice makes perfect. Experiment with different techniques, and gradually increase the intensity of the corrections until you reach the desired outcome. Always prioritize a natural-looking result over excessive editing. By understanding the tools and applying them thoughtfully, you can achieve professional-quality teeth whitening in Photoshop Elements. With a little practice, you’ll be able to transform any photo into a stunning portrait with a radiant smile, boosting your confidence and improving the quality of your photography projects. Enjoy your journey to beautiful smiles!