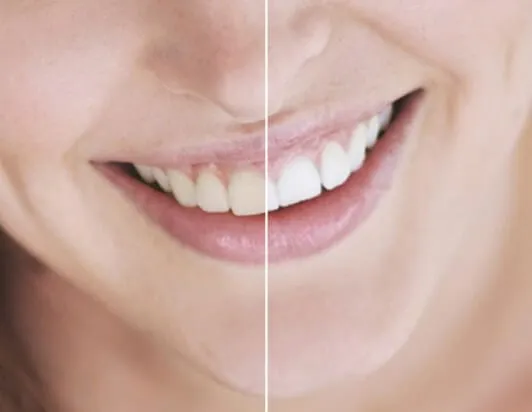
What is Free Online Teeth Whitening Photo Editing?
Free online teeth whitening photo editing refers to the process of digitally enhancing the appearance of teeth in a photograph using free, web-based tools. These tools allow users to lighten the shade of teeth, giving the impression of a brighter, whiter smile. This can be achieved through various features such as brightness and contrast adjustments, color correction, and specialized teeth whitening tools. The primary advantage is the accessibility and cost-effectiveness; anyone with an internet connection can use these tools without needing to download or pay for expensive software. These services are designed to be user-friendly, making them accessible to both novice and experienced users who want to improve the aesthetic appeal of their photos.
Benefits of Using Free Online Teeth Whitening
There are numerous advantages to utilizing free online teeth whitening tools. The most significant benefit is the cost; unlike professional teeth whitening treatments or expensive software, these online tools are available at no charge. This makes it an accessible option for everyone. Moreover, these tools are incredibly convenient. You can access them from any device with an internet connection, eliminating the need for downloads or installations. Time-saving is another key advantage. With just a few clicks, you can quickly edit your photos and achieve a whiter smile, saving time compared to more complex editing processes. Additionally, the user-friendly interfaces of these tools make them easy to use, regardless of your editing experience, allowing you to achieve professional-looking results effortlessly.
Accessibility of Online Teeth Whitening

Accessibility is a key benefit of free online teeth whitening tools. These tools are typically available through web browsers, which means they can be accessed from virtually any device, including smartphones, tablets, and computers, as long as you have an internet connection. This widespread availability ensures that anyone, anywhere, can use these tools. Furthermore, the user-friendly interfaces of these online tools are designed with simplicity in mind. This makes them easy to navigate and use, regardless of your experience with photo editing. The ease of use is particularly beneficial for individuals who are not familiar with complex software, allowing them to achieve impressive results without extensive training or tutorials.
Step-by-Step Guide to Free Online Teeth Whitening
To get started with free online teeth whitening, begin by choosing the right photo editing tool. Many platforms offer this feature, so it is wise to explore different options and compare their user interfaces and available functionalities. Once you have selected your tool, the next step is to upload and prepare your photo. Ensure that your image is of good quality and that the teeth are clearly visible. After uploading the photo, locate the teeth whitening feature, which is usually found in the adjustments or retouching section of the tool. Finally, apply the whitening effect to the teeth, adjusting the intensity to achieve the desired brightness. Take care not to over-whiten the teeth; instead, aim for a natural look that complements the overall tone of the photo.
Choosing the Right Photo Editing Tool
Selecting the right photo editing tool is vital for effective teeth whitening. Consider factors like ease of use, features offered, and user reviews when making your choice. Some tools provide a simple interface ideal for beginners, while others offer more advanced features for experienced users. Ensure that the tool has a dedicated teeth whitening feature, often in the form of a slider that controls the intensity of the whitening effect. Furthermore, investigate any additional tools or features, such as adjustment options for brightness, contrast, and color, which will allow you to fine-tune your results. Ultimately, the best tool for you is one that meets your specific needs, offers a user-friendly experience, and delivers the results you desire.
Uploading and Preparing Your Photo

Before you start whitening your teeth, you will need to upload your photo to the online editing tool. Most tools allow you to upload directly from your computer, cloud storage, or social media accounts. Once the photo is uploaded, take a moment to prepare it for editing. This might include cropping the photo to focus on the subject, adjusting the orientation, or correcting any basic imperfections. Before starting the whitening process, assess the overall quality of the image. Ensure that the teeth are well-lit and clearly visible, which is crucial for achieving the best possible results. A good quality image makes the editing process easier and leads to more natural-looking outcomes.
Finding the Teeth Whitening Feature
The location of the teeth whitening feature can vary depending on the photo editing tool you use. However, it is typically located within the retouching or adjustment section of the tool. Look for a menu or tab labeled ‘Retouch,’ ‘Enhance,’ or something similar. Within this section, you should find specific tools designed for teeth whitening. These tools often come in the form of a slider or a color adjustment that allows you to control the intensity of the whitening effect. Some tools may also offer advanced options, such as the ability to select the teeth individually or adjust the whitening effect for different parts of the teeth. Experiment with these features to understand how they work and to find the most effective settings for your image.
Adjusting Brightness and Contrast for Natural Results
When whitening teeth, adjusting the brightness and contrast can significantly impact the final look. Begin by subtly adjusting the brightness to enhance the overall appearance of the teeth without making them appear overly bright. Use the contrast adjustments to add depth and detail to the image, which can prevent the teeth from looking flat or artificial. When adjusting brightness and contrast, it is essential to maintain a natural appearance. Avoid extremes that could make the image look unnatural. Small, careful adjustments will help you achieve a more realistic and appealing result. Always evaluate the changes against the rest of the photo to ensure a harmonious appearance.
Whitening Your Teeth in the Photo

Once you’ve found the teeth whitening tool, it’s time to apply the effect to the teeth in your photo. Most tools offer a slider or a similar control to adjust the intensity of the whitening. Start by making small adjustments, observing how the changes affect the appearance of the teeth. It is crucial to avoid over-whitening, which can lead to an unnatural and often unflattering result. Instead, aim for a subtle enhancement that brightens the teeth while maintaining a natural look. Pay attention to the tone and color of the teeth and make adjustments that are consistent with the rest of the image. Experiment with the settings until you achieve the desired level of whiteness without compromising the overall aesthetic.
Fine-Tuning and Refining the Edited Image
After whitening your teeth, it is essential to fine-tune and refine the edited image to achieve the best results. This may involve making small adjustments to the brightness, contrast, and color balance to ensure the teeth look natural and blend seamlessly with the rest of the photo. You might also want to use the tool’s other features, such as sharpening or smoothing, to enhance the overall quality of the image. Carefully examine the results and make minor adjustments as needed. Take the time to perfect your image, so it appears flawless and professional, reflecting your overall vision. Always compare the edited image with the original to make sure the final outcome is a significant improvement.
Common Mistakes and How to Avoid Them
Several common mistakes can detract from your online teeth whitening efforts. Understanding these pitfalls is essential to achieving optimal results. Over-whitening is one of the most frequent issues, where the teeth become excessively bright and appear artificial. To avoid this, use a light touch and make gradual adjustments. Ignoring the background is another common mistake, where the surrounding elements of the photo are not considered. Make sure the background complements the overall image. Not saving your work is an easy mistake to make. Always save your edited photos in a suitable format to avoid losing your progress and to maintain the quality of the image. Addressing these errors ensures a more professional outcome.
Over-Whitening Your Teeth

Over-whitening is one of the most common mistakes made when editing teeth in photos. It happens when the teeth are lightened too much, resulting in an unnatural, almost glowing appearance. This can draw attention away from the rest of the photo and make the subject look less genuine. To avoid over-whitening, use a subtle approach. Start with small adjustments and gradually increase the whitening effect until you achieve the desired brightness without making the teeth appear artificial. Make sure to compare the edited teeth with the other elements in the image, such as the skin tone and the surrounding light, to maintain a balanced and natural look. Always remember that a natural look is the ultimate goal.
Ignoring the Background
Another mistake to avoid is ignoring the background of the photo. A poorly edited background can distract from the improved teeth. For example, if you brighten the teeth excessively, they may stand out too much against the background, creating an imbalance. Always consider the background when editing your photos. Ensure that the overall brightness, contrast, and color balance are consistent throughout the image. If necessary, make adjustments to the background to complement the newly whitened teeth and maintain a cohesive aesthetic. This will help your edited photo look more professional and visually appealing, with all elements working together harmoniously.
Not Saving Your Work
Perhaps the most easily avoidable error is not saving your work. Photo editing tools often allow you to save your edited photos in various formats, such as JPEG or PNG. Always save your edited image after completing the teeth whitening process. This action preserves your changes, allowing you to revisit and modify the image later. Make sure you choose a suitable format that is consistent with your needs, be it for printing, sharing online, or long-term storage. Also, back up your work, as it can prevent data loss. Double-checking the file is saved will protect your work. Failing to save your edited photo means you will lose all the effort and adjustments. It is a simple step that prevents major frustration.
Best Free Online Teeth Whitening Tools

There are many free online teeth whitening tools available, each with its unique features and advantages. Some of the popular options include tools that offer user-friendly interfaces and powerful editing features. When selecting a tool, consider factors such as ease of use, the range of editing options, and the overall image quality. Always explore different options to identify the ones that best suit your personal and professional requirements. Comparing various tools allows you to select the most appropriate option. Look for features like automatic enhancements, custom adjustments, and the ability to fine-tune the final outcome. The best free online teeth whitening tool should provide a balance of ease of use and robust editing capabilities, ensuring that the outcome meets or exceeds your expectations. A good tool can transform your smile easily.
Tool 1 Overview
Tool 1 is known for its user-friendly interface and ease of use. It provides a simple, intuitive process for teeth whitening, making it an excellent choice for beginners. Key features include a straightforward slider to adjust the whitening intensity and basic enhancement tools. The tool focuses on delivering a quick and easy editing experience, allowing users to achieve noticeable improvements without requiring advanced editing skills. The platform is accessible online, making it available on any device with an internet connection. The interface is generally straightforward, making the entire photo-editing process quick and effective. Users can expect to get professional-looking results.
Tool 2 Overview
Tool 2 offers a more advanced range of features, catering to users with more experience in photo editing. It offers a wide array of control settings, with greater customization. The tool’s interface is also intuitive. It enables users to control multiple settings. It also has options for correcting other imperfections, such as blemishes and uneven tones. The interface is designed for users to explore and improve their images. Users can create excellent photos with a focus on natural effects. Also, Tool 2 is easily accessible online and compatible with all devices. The tool prioritizes providing a more complex and customizable environment for effective photo editing.
Tool 3 Overview

Tool 3 is distinguished by its AI-powered capabilities. It utilizes artificial intelligence to automatically detect and whiten teeth, providing a seamless and time-saving experience. This tool simplifies the editing process by automating many steps. The AI technology also ensures a natural-looking result. Furthermore, Tool 3 provides basic editing functionalities like brightness and contrast adjustments. It is easily accessible via a web browser and accessible on different devices. Overall, Tool 3 offers a streamlined, automated experience, making it ideal for users who desire quick, quality outcomes. Its ease of use ensures that anyone can edit their photos and achieve the desired outcome.
Tips for Achieving Natural-Looking Results
To ensure your teeth whitening efforts look natural, it is essential to use a subtle approach. The goal is to enhance the appearance of the teeth without making them appear artificial. Matching the tone of your teeth to the rest of the photo is crucial, as this prevents the teeth from looking out of place. Considering the lighting in the photo is also vital. Adjusting the brightness and contrast to complement the existing light enhances the effect. By applying these techniques, you can make sure your edited photo is appealing, with the focus remaining on a natural look that is flattering and realistic.
Use Subtle Adjustments
To achieve a natural look, make small adjustments to the teeth whitening tool. Start with a slight increase in brightness or a minor color correction, and observe the effect. Gradually increase the intensity, being careful to avoid over-whitening. The aim is to enhance the teeth subtly so they appear brighter and cleaner. This avoids an artificial or overly bright look that can detract from the photo. Always check the results and compare them to the rest of the image. Make any adjustments needed to maintain a natural, realistic, and visually appealing outcome. Small, careful modifications are better than drastic changes.
Match the Tone of Your Teeth

One of the most important steps in the natural-looking teeth whitening process is matching the tone of the teeth to the overall color palette of the photo. The goal is to create a consistent and harmonious appearance. Avoid making the teeth too bright, as this can cause a dissonance with the skin tone and other colors in the image. Use tools for color correction to adjust the hue and saturation of the teeth. This ensures that they complement the background and other elements. Matching the tone ensures that your edits blend seamlessly into the picture. The outcome should be a cohesive and realistic effect, with the focus on enhancing the smile while maintaining the image’s overall integrity.
Consider the Lighting
Understanding and adapting to the lighting conditions in your photo is critical when whitening teeth. The lighting greatly impacts how the teeth appear, so any adjustments should be made in line with these conditions. If the image is well-lit, you can be more liberal in the whitening process. Conversely, if there are shadows, make subtle adjustments to maintain the overall natural look. The overall brightness and contrast of the image must be considered to integrate the teeth whitening seamlessly. Lighting also affects the shadows and highlights on the teeth. Make sure your editing enhances the lighting and contributes to a realistic appearance. By paying close attention to lighting, you can achieve a more natural and attractive result.
Enhancing Your Smile Beyond Whitening
Enhancing your smile with photo editing involves more than just whitening your teeth. Consider other steps, such as correcting imperfections and adding a subtle glow. By addressing these other details, you can create a natural smile makeover that compliments the main enhancement. Combining various methods yields a polished look. This technique will make your images more attractive and natural. This way, you can attain a more complete makeover that significantly improves the overall aesthetics of the photo.
Correcting Other Imperfections
When enhancing your smile, consider correcting any additional imperfections such as minor blemishes or uneven textures. Most photo editing tools offer features that allow you to smooth the skin, remove spots, and even out the skin tone. Such enhancements make your photos more appealing and polished. Pay attention to any other irregularities, and use the appropriate tools to address them. This makes your smile appear brighter and more refined. Remember to use these tools carefully and subtly to ensure that the results look natural. Correcting imperfections boosts the effect of your teeth whitening, and improves the overall aesthetics of your photos.
Adding a Subtle Glow
Adding a subtle glow to the teeth can create an improved smile. Most editing tools have features that enable users to adjust the brightness and luminosity of the teeth, thus making them appear more radiant. Use these features carefully to prevent an overly artificial appearance. A soft, subtle glow will accentuate the teeth while maintaining a natural look. By adding a glow, you can make the teeth appear healthy and appealing. This enhancement boosts the effect of the whitening process. Moreover, it contributes to a more radiant and attractive smile. This small adjustment improves the image’s overall quality.
Conclusion Your Perfect Smile is a Click Away
Free online teeth whitening photo editing provides a convenient, accessible, and cost-effective method for enhancing your smile. By using the tools and applying the techniques described in this guide, you can easily achieve a brighter and more attractive smile in your photos. Remember the key principles. Choose the right tools, be mindful of the lighting, and always aim for a natural look by making subtle adjustments. Avoid common mistakes such as over-whitening and ignoring the background. Take advantage of the various free online tools available. With practice and patience, you can create stunning results. Embrace the possibilities of photo editing and enhance your photos.